![]()
Most Espressif chips include a built-in WiFi module. This module was developed by third-party specialists, so a significant part of the WiFi driver source code is unavailable. Instead of source code, only compiled libraries and header files are provided. During WiFi initialization, microcode is loaded into an internal FPGA that implements all wireless interface functionality.
Some Espressif microcontrollers do not have built-in WiFi support. For example, the ESP32-P4 uses a dual-MCU configuration where one of the MCUs acts as a WiFi module (the ESP32-P4 itself does not include WiFi). Note: ESPShell supports only chips with hardware-integrated WiFi (e.g., ESP32, ESP32-S3, ESP32-C6).
Arduino user sketches typically rely on the “standard” WiFi library for ESP32, which is a wrapper around ESP-IDF APIs. ESPShell does not conflict with such sketches: even though it does not know anything about the WiFi Library, it uses the same underlying API and does not store pointers to interfaces or their settings. If WiFi was initialized inside the user sketch, the shell correctly interacts with the already running interface. Moreover, one of the main use cases of ESPShell is the ability to change network settings on the fly— override IP addresses, passwords, and SSIDs right during execution of the user application. If the user sketch does not manage WiFi at all but wants to use BSD sockets, the user can manually configure network interfaces and then resume the sketch (interrupt with Ctrl+C, continue with “resume”).
ESPShell supports two WiFi interfaces: sta (Station) and ap (Access Point). The sta interface is used to connect to an existing network (e.g., Internet access), and the ap interface is used to create your own access point. Both interfaces can be enabled simultaneously, which allows routing and NAT — effectively turning ESP32 into a WiFi extender.
As with other ESP32 interfaces, working with WiFi starts by switching to the desired mode. Run wifi sta or wifi ap:
  esp32#>wifi sta
  esp32-sta>
  esp32#>wifi ap
  esp32-ap>
To exit WiFi configuration mode, use exit (or press Ctrl+Z).
Note: To view WiFi settings (via "show wifi ..."), the interfaces must exist. They are created either by the user sketch (calling WiFi.begin(...)) or manually by executing any command starting with "wifi" (for example, "wifi sta").
To display WiFi interface state and parameters, use show wifi with the required argument:
  esp32#>show wifi ap      ← AP interface info
  esp32#>show wifi sta     ← STA interface info
  esp32#>show wifi clients ← information about STA clients connected to our AP
Below is an example output of show wifi sta when no connection is established. The line “Configured:” shows information read from flash memory (if previously saved with wifi storage flash).
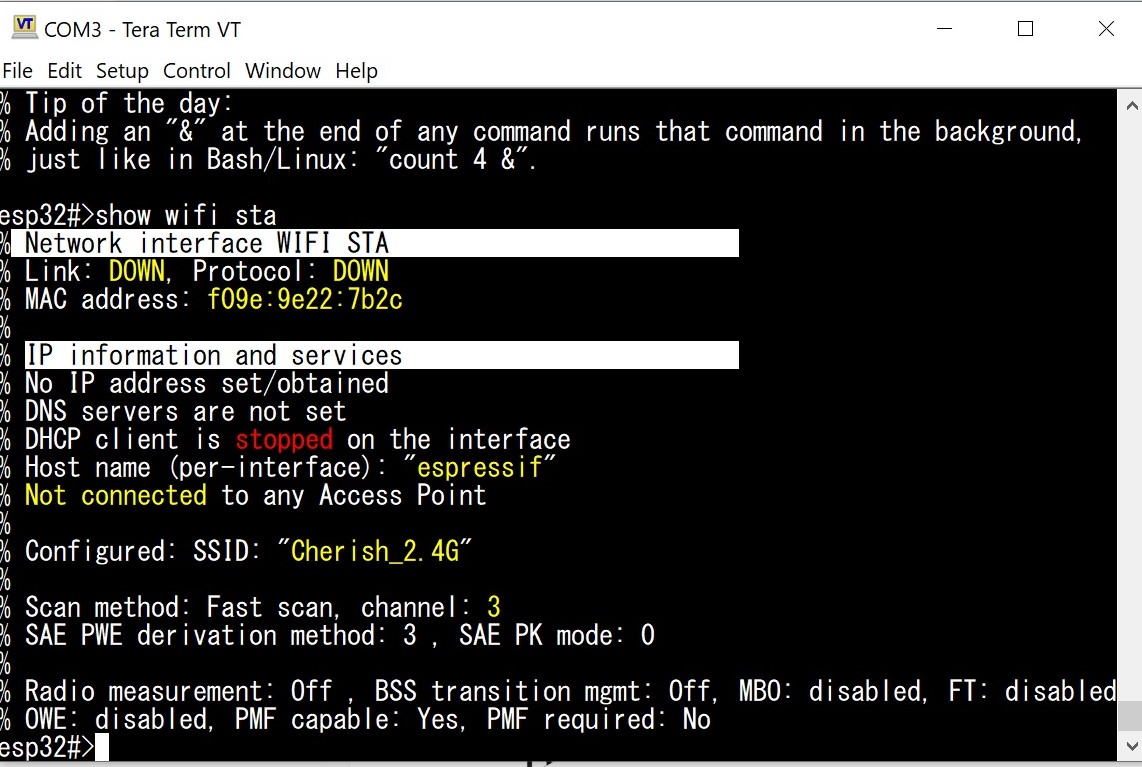
Fig. 1: Output of show wifi sta (no connection)
Scanning is used to retrieve the list of available networks and parameters of specific access points.
ESP32 supports two scanning modes: active (command scan) and passive (scan passive). Active scanning sends WiFi Probe Requests and is the default. If you add passive, ESPShell performs passive scanning: no packets are sent; the device simply listens.
esp32#>scan passive
If you pass bssid and a MAC address, you can obtain extended information about a specific AP:
esp32-ap>scan bssid CC50:0AC2:3E44
...
Scanning is available for both interfaces (STA, AP, or AP+STA).
While configuring WiFi, you can enable the NTP client, which periodically synchronizes time with a remote server. NTP server addresses are obtained from DHCP by default. If DHCP does not supply servers, static servers time.windows.com and pool.ntp.org are used. If DHCP does provide an NTP server, two static servers are added to it.
You may also configure only static NTP servers. In this case, DHCP-provided servers are ignored. Up to three NTP servers are supported: one from DHCP and two (or all three) static.
By default, the NTP client is stopped. To start it, run "ntp enable" on any WiFi interface. The "ntp" command supports chained arguments:
  esp32-sta>ntp dhcp
  esp32-sta>ntp enable
can be written as:
esp32-sta>ntp dhcp enableTo use DHCP-provided NTP servers:
esp32-sta>ntp dhcpTo use your own servers:
esp32-sta>ntp pool.ntp.orgIP addresses are allowed as well.
Example: setting three static servers:
esp32-sta>ntp disable 1.1.1.1 time.windows.com 2.2.2.2Example: mixing DHCP + static:
esp32-sta>ntp 1.1.1.1 time.windows.com dhcpImportant: for mixed mode, “dhcp” must appear after all static servers.
If WiFi is connected, an IP is obtained, and NTP servers configured, synchronization will occur within seconds. Check with "show time".
Before exploring commands in detail, let's connect to an available network. Enter STA configuration mode:
  esp32#>wifi sta
  esp32-sta>
In this mode, commands for configuring the station interface become available. Use ? to list them:
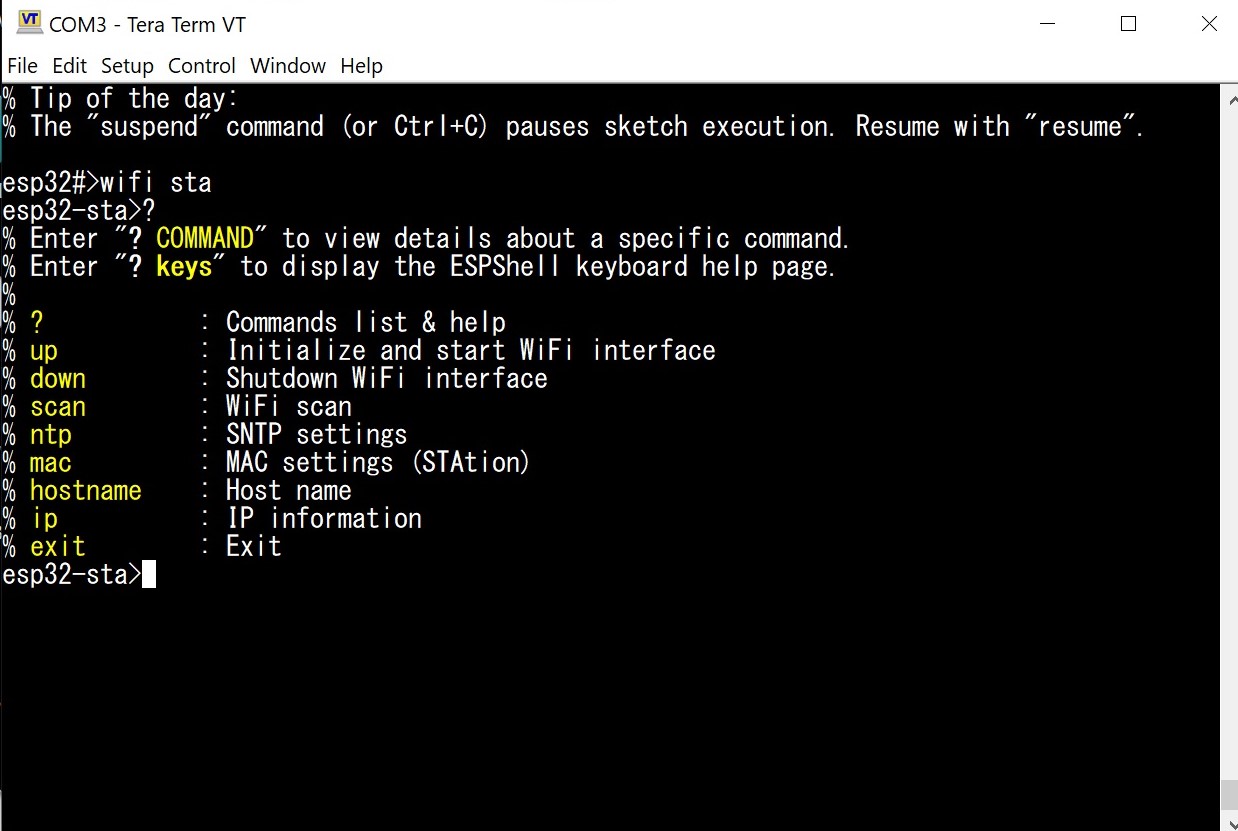
Fig. 2: Commands available in STA mode
To display available networks, use scan.
esp32-sta>scan
...
Choose “SomKiat Suksamran” and connect using password Klong1414. SSID contains spaces, so quotation marks are required. Activation is done with up.
esp32-sta>up "SomKiat Suksamran" Klong1414 auto
...
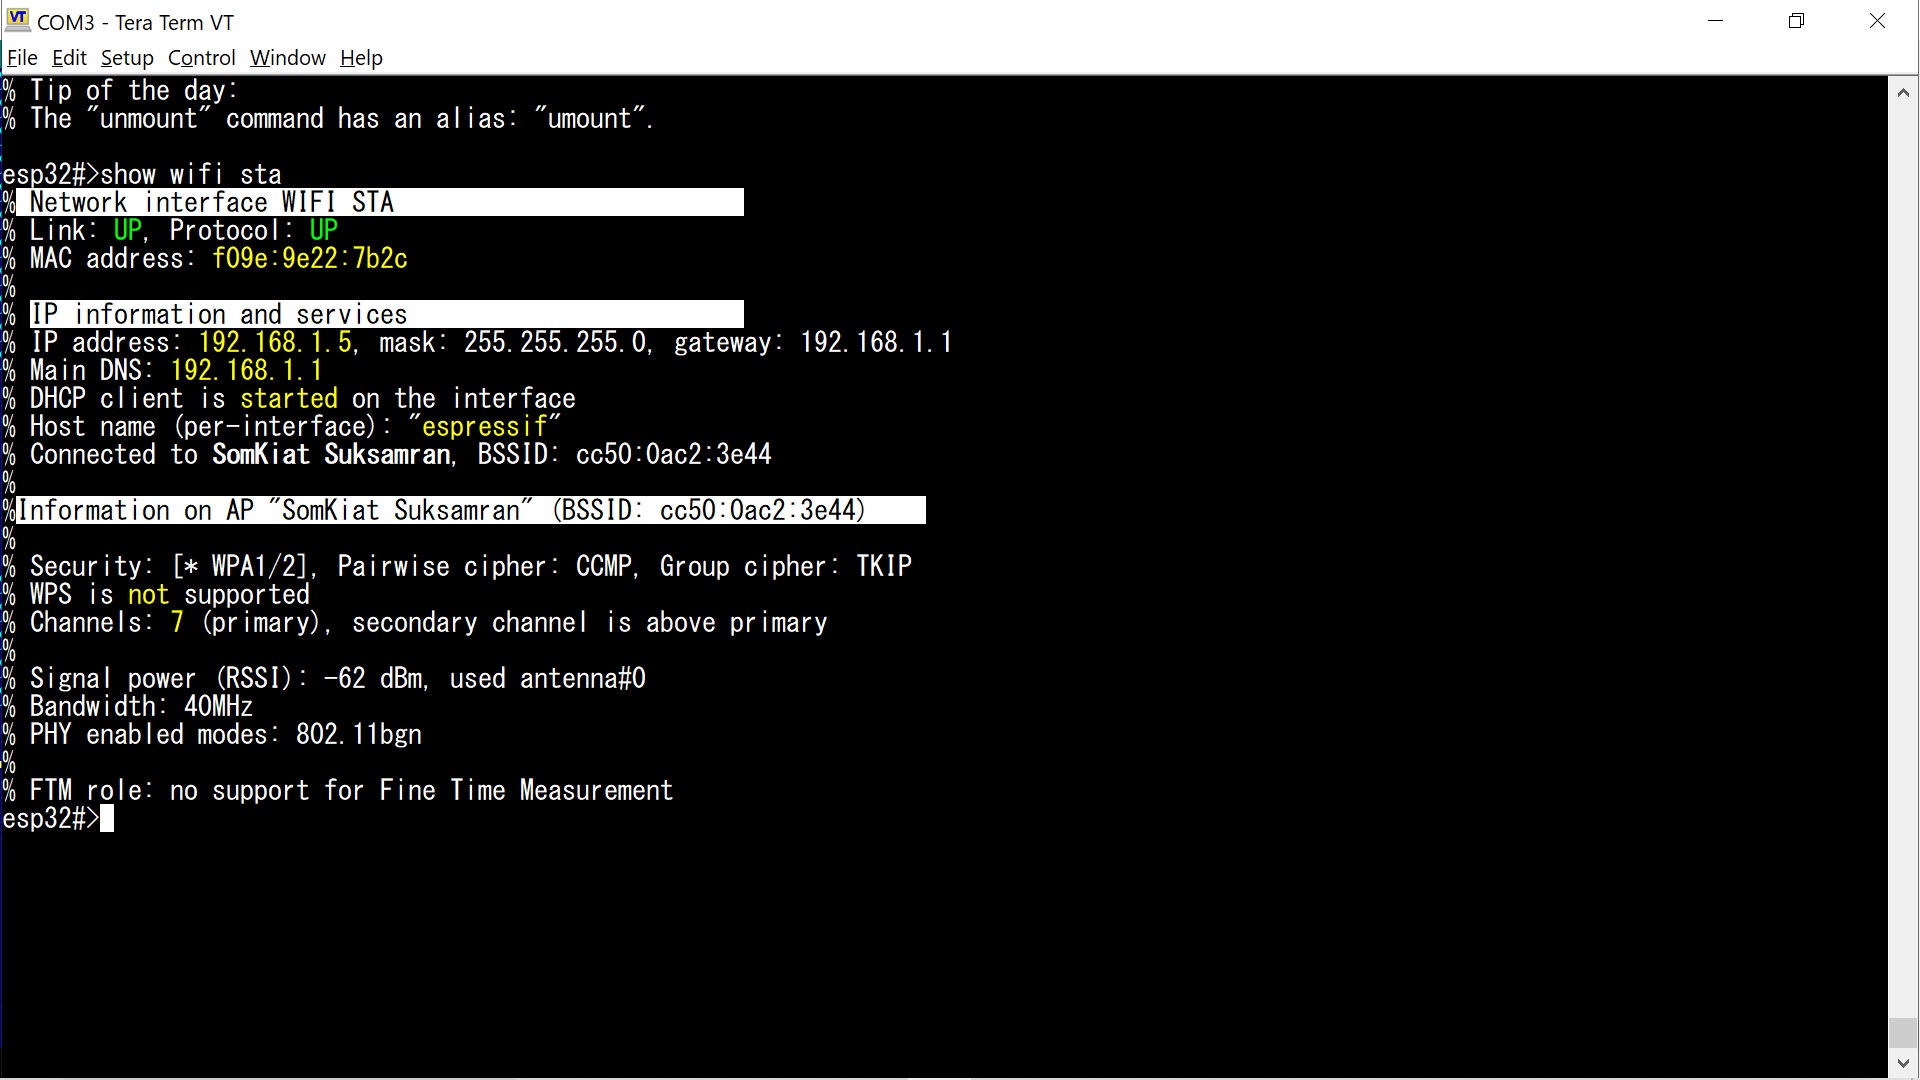
Fig. 3: Output of show wifi sta — connected
Simple enough. Now — the details.
Working with the STA interface begins with wifi sta. It is recommended to configure the interface before connecting — especially when using a static IP. Changing the IP after connecting will cause reconnection.
| Command | Description |
|---|---|
ip |
ip address ADDRESS/PREFIX | dhcp [dns ADDRESS | gw ADDRESS]* Sets static or dynamic IP, netmask, gateway and DNS servers. By default, DHCP client is enabled: esp32-sta>ip address dhcp Static IP example: esp32-sta>ip address 192.168.0.2/24 gw 192.168.0.1Mask is in CIDR format. If omitted, /32 is assumed, but ESPShell auto-corrects it to /24 for typical WiFi usage. If no gateway is provided, ESPShell assumes A.B.C.1. Both examples below are equivalent: esp32-sta>ip address 192.168.0.2/24 gw 192.168.0.1 esp32-sta>ip address 192.168.0.2 Example: DHCP + static DNS: esp32-sta>ip address dhcp dns 8.8.8.8 dns 4.4.4.4 |
up |
up [NETWORK_NAME_OR_MAC [PASSWORD [auto-reconnect]]] Enables the interface (connects to AP). Examples: esp32-sta>up McDonalds_FREE esp32-sta>up McDonalds_FREE "" auto-reconnect esp32-sta>up McDonalds myPaSsword esp32-sta>up McDonalds myPaSsword auto-reconnect |
down |
down Disconnects or aborts connection. |
mac |
mac MAC_ADDRESS Sets MAC address. Changing the MAC while connected will trigger reconnection. Formats accepted: AA:BB:11:22:33:44, aaBB:1234:56Ff, 001122334455. Example: esp32-sta>mac 0044:afaf:dead The MAC must not collide with the AP interface. Multicast and broadcast MACs cannot be used. |
hostname |
hostname TEXT Sets hostname. Espressif firmware supports unique hostnames per interface. Example: esp32-sta>hostname mars.local |
The simplest way to create an access point (AP) is to switch to the wifi ap mode and run the "up" command. The "up" command has one required parameter and two optional ones: the network name, password, and the maximum number of clients allowed to connect. Example:
esp32-ap>up Barmalei78 MyP@ssworT max-conn 4This command creates a WiFi network "Barmalei78" with the password MyP@ssworT and a maximum of four connections (which is also the default value). Example of creating a network without a password, for a single client:
esp32-ap>up Barmalei78 "" max-conn 1If the max-conn parameter is not needed, then for an open (no-password) network you can simply run:
esp32-ap>up Barmalei78By default, the access point is configured with the following parameters:
Alright, suppose we created an access point called Barmalei78 with the following parameters:
esp32-ap>up Barmalei78 PaSSword1923 max-conn 2Is it possible to create a router if both interfaces (STA and AP) are active? Yes, it is. All you need is to enable NAT on the AP interface:
esp32-ap>nat enableNow, if the STA interface is connected to the Internet, then clients connected to our access point (on the AP interface) will also have Internet access.
Example: connect the STA interface to the Internet (network "SomKiat Suksamran", password "Khlong1822"), and use the AP interface to share the Internet. The AP should be open (no password), with the network name "FreeWiFi".
  esp32#>wifi sta
  esp32-sta>up "SomKiat Suksamran" Khlong1822
  esp32-sta>exit

esp32#>wifi ap
esp32-ap>up "FreeWiFi"
esp32-ap>nat enable
esp32-ap>exit
Working with the AP interface begins with the wifi ap command.
| Command | Description |
|---|---|
ip |
ip address ADDRESS/PREFIX [dns ADDRESS]* Sets a static or dynamic IP address, network mask, and DNS servers. It is also possible to set a default gateway via the gw parameter, same as on the STA interface — but this will most likely break client connectivity. Note: if DNS is not specified, the default DNS will be set equal to the interface’s own address. In this case, when the STA interface connects to a network and obtains DNS settings via DHCP, those DNS settings will also propagate to the AP interface. To prevent automatic DNS changes on the AP interface, specify the DNS explicitly when setting the IP address:esp32-ap>ip address 192.168.4.1/24 dns 8.8.8.8If you set the address as follows: esp32-ap>ip address 192.168.4.1/24then the DNS server will be set to 192.168.4.1, but as soon as the STA interface establishes a connection and obtains DNS values, the AP DNS settings will automatically be updated. This behavior is required for router mode. As in the STA interface, the network mask is specified in CIDR format (in the example — /24), i.e., using the prefix length. |
up |
up [NETWORK_NAME [PASSWORD [max-conn NUM]]] Turns on the interface (creates an access point). You can use up without parameters for reconnecting if ESPShell remembers the parameters of a previous successful connection (see storage). Usually two parameters are given — network name and password. For open networks, the password may be omitted or replaced with empty quotes "". Optionally, you can specify the maximum number of clients using the keyword max-conn (default is 4). Examples: esp32-ap>up McDonalds_FREE - Open network, no password, max 4 clients esp32-ap>up McDonalds_FREE "" max-conn 1 - No password, 1 client esp32-ap>up McDonalds myPaSsword - With password |
down |
down Disables the interface: shuts down the access point and disconnects all connected clients. |
mac |
mac MAC_ADDRESS Sets a new MAC address. The interface must be "up" in order to change the MAC address (this is a WiFi driver limitation). The shell accepts several formats, for example: AA:BB:11:22:33:44, aaBB:1234:56Ff, or 001122334455 — all are valid. Example: esp32-sta>mac 0044:afaf:deadYou cannot assign a MAC address already used by another interface (e.g., the STA interface). Also disallowed are addresses where the least significant bit of the first byte is set (0133:3333:3333 — invalid, 0233:3333:3333 — valid). Broadcast addresses cannot be used as interface MAC addresses. |
hostname |
hostname TEXT Sets a new hostname. In Espressif’s implementation each network interface has its own hostname. Example: esp32-sta>hostname snikers.local |
dhcp |
dhcp enable | disable dhcp A.B.C.D [COUNT] Enables/disables the DHCP server, sets the address pool for clients. Default settings: esp32-ap>dhcp 192.168.4.2 15 ← assign addresses 192.168.4.2 ... 192.168.4.17 esp32-ap>dhcp enable ← enable the DHCP server |
nat |
nat enable | disable Enables/disables NAT. Default: esp32-ap>nat disableWith NAT enabled, the AP running, and the STA interface having an active connection, the ESP32 becomes a small router capable of delivering around 14 Mbit/s while working as a WiFi extender. |
kick |
kick all | AID Disconnects (deauthenticates) a station by its AID (a number from 1 to 65535, shown in the "AID" column of the "show wifi clients" command), or all stations if the keyword "all" is used. esp32-ap>kick all esp32-ap>kick 1 esp32-ap>kick 4 |
To view the list of connected clients, use the "show wifi clients" command. The command displays a list of clients authenticated with our access point. The output looks like this:

Fig. 4: Output of show wifi clients
By default, WiFi stores all user settings in RAM. This means that after a reboot, the settings will be lost and must be entered again: network name, password, IP address, etc. To persist these settings, use the "wifi storage flash" command. After executing it, the driver will store WiFi configuration in the internal flash memory and load it on reboot. The "wifi storage flash" mode must be enabled after each reboot: the storage mode always resets to "ram".
ESPShell does not automatically activate interfaces at startup, even if it knows the stored network names and passwords: activation is done only manually by the user using "up" and "down". ESPShell will store settings in flash and read them back, but to apply them, you must execute the "up" command without parameters.
  esp32#>wifi storage ram      ← default: everything stored in RAM
  esp32#>wifi storage flash    ← store configuration in FLASH